


Installing Joomla with Xampp (local host sever)
Installing Joomla with Xampp

Welcome to our site. If you
want to install Joomla with an offline server (XAMPP) and start building
web-site. But you are new, and don’t know how to install it. Then this is a platform
for you. Using Joomla you can make a powerful website but only need proper
knowledge about Joomla. Stay with us and learn more.
But before we proceed you
need to have an offline server (XAMPP) in your system or you can install it
here XAMPP.
And run it. How
to install XAMPP .
Having believe that you
have install your xampp, just kindly download the new version of Joomla Here JOOMLA
Create Database for Joomla Installation
---------------------------------------------------------------------------------------------------------------------
Double click on
your xampp icon on your desktop background to run the offline server


It is time for us to
Install Joomla
It’s time to install Joomla on your PC. Visit
http://localhost/joomla/ on your browser, it will redirect to
http://localhost/joomla/installation/index.php and you can start installing
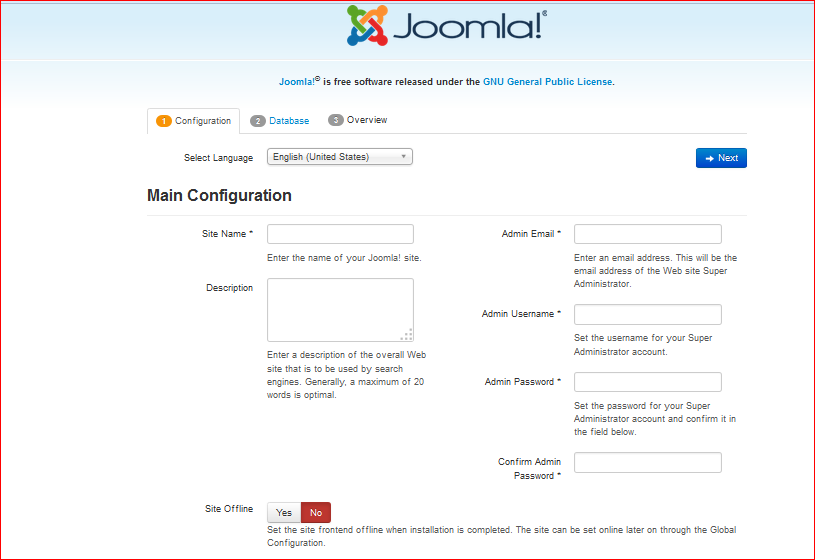
Joomal using its web installer. See below figure.Basically there are three steps to install Joomla into your computer:
(1) main configuratin of your Joomla site;
( 2) database configuration;
(3) Finalize Joomla installation.
Now we are going to do it step by step
First Step Main Configuration
- Select
Language: Choose
your own language in the drop-down menu, for example, “English (United Kingdom)”
- Site
Name: Enter the name of your site, for
example, “learnerstools Site”
- Description: Enter
the description of your site example “A learning platform”
- Site
Offline: Choose status for your website when you
access to your site: Click “Yes”
for “offline” and “No” for “online”
- Admin
Email: Enter your valid email address you want
to use for your site
- Admin
Username: Enter “admin” as default or a custom name
- Admin
Password: Enter your own password
- Confirm
Admin Password: Re-type your password
- Click “Next” to continue Step 2
Second Step . Database Configuration
- Database
Type: Select MySQLi
- Host
Name: Enter “localhost”
- Username: Enter “root” or the user name given by the host
- Password: let it
blank
- Database
Name: enter the name of the database you
created above using phpMyAdmin, for example “joomla” as shown in above
screenshot
- Table Prefix: let it generate automatically
- Old Database Process: Click “Backup” to backup
tables from former Joomla! installation, or “Remove” to delete these
tables
- Click “Next” to continue Step 3

Third Step . Overview
Finalization:
You can choose installing sample data or not, by clicking on corresponding
selection.
Overview:
This step is to review all information you configured in step 1. After
checking, you click “Install”.
When
installation finishes, you just need to click the button “Remove installation folder”
button to complete the installation process. After that, you can either click
on “Site” to see your newly
created or “Administrator” to access the
administration area.

When
installation finishes, you just need to click the button “Remove installation folder”
button to complete the installation process. After that, you can either click
on “Site” to see your newly
created or “Administrator” to access the
administration area.

if this post help you, pleas comment and share...
Category: Tech


0 comments